Create and Manage AWS Account (AWS IAM) With Terraform

Image by Arief JR
After you registered in AWS, you should manage the name is IAM first. IAM is stands Identity and Access Management. It is very important before you go develop an application or services, so should setup or manage first.
If only use root account it will be dangerous in terms of security as well IAM users. Many cases the users without granting/ not permitted to this AWS account can create the resources for bitcoin miner.
IAM users function is for limit in AWS Resources, like read only resource from other division or except for infra. so other users cannot create the resource, because the user have a limitation or policy. In this tutorial will create several users, group and custom policy for manage / maintain the IAM.
This post is continued from the post earlier Create AWS Organization With Terraform
1. Create Main Terraform Script
The default IAM account alias will follow Account ID, but can customize with your organization. you can see the account alias, go to IAM service on the righ dashboard will see the account alias. for example i will change the account alias, and add pgp_key. here this full script:
aws-iam.tf
1
2
3
4
5
6
7
8
9
10
11
12
13
14
15
16
17
18
19
20
21
22
23
24
25
26
27
28
29
30
31
32
33
34
35
36
37
38
39
40
41
42
43
44
45
46
47
48
49
50
51
52
53
54
55
56
57
58
59
60
61
62
63
64
65
66
67
68
69
70
71
72
73
74
locals {
pgp_key = "keybase:tuxnoob"
manage = "Terraform"
organization = "tuxnoob"
}
resource "aws_iam_account_alias" "alias" {
account_alias = "tuxnoob"
}
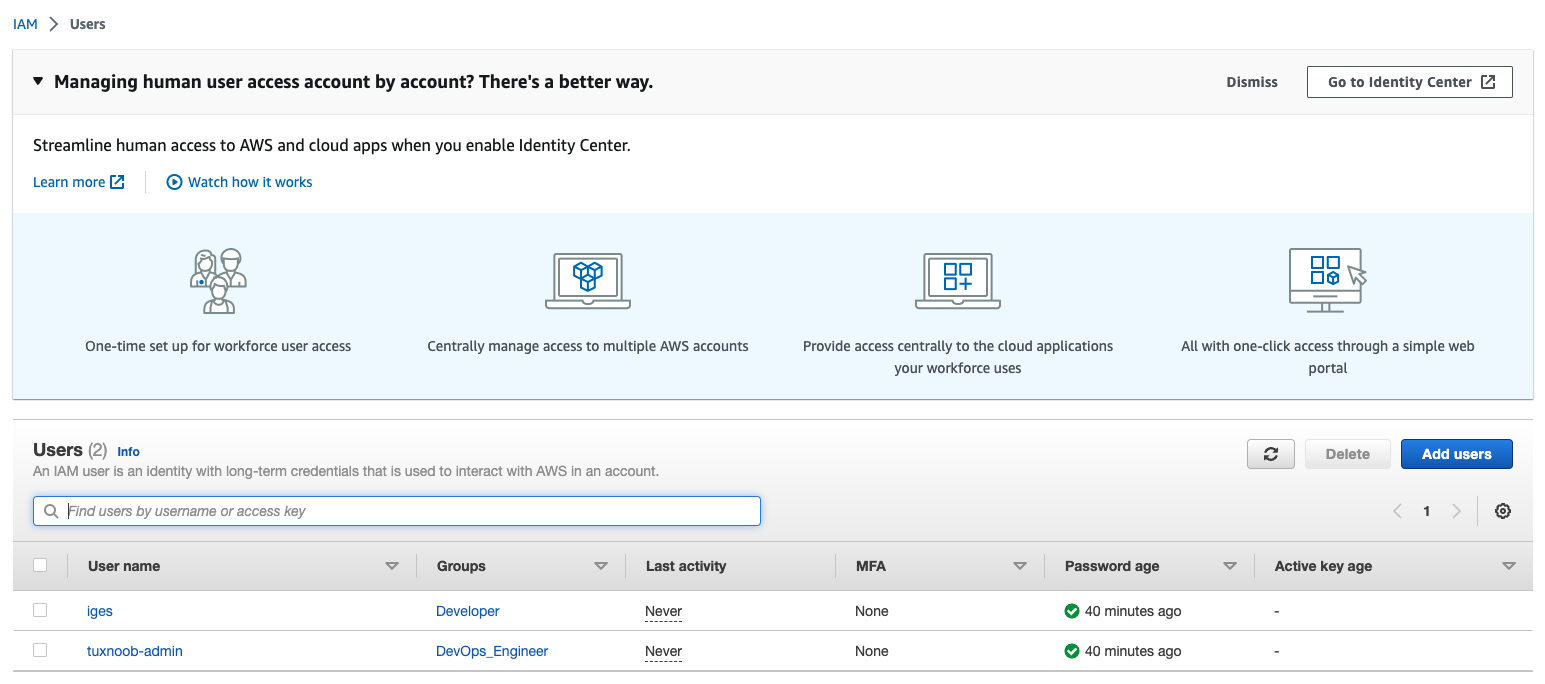
resource "aws_iam_user" "iges" {
name = "iges"
tags = {
Name = "Developer Users"
ManagedBy = local.manage
organization = local.organization
}
}
resource "aws_iam_user_login_profile" "iges" {
user = aws_iam_user.iges.name
pgp_key = local.pgp_key
}
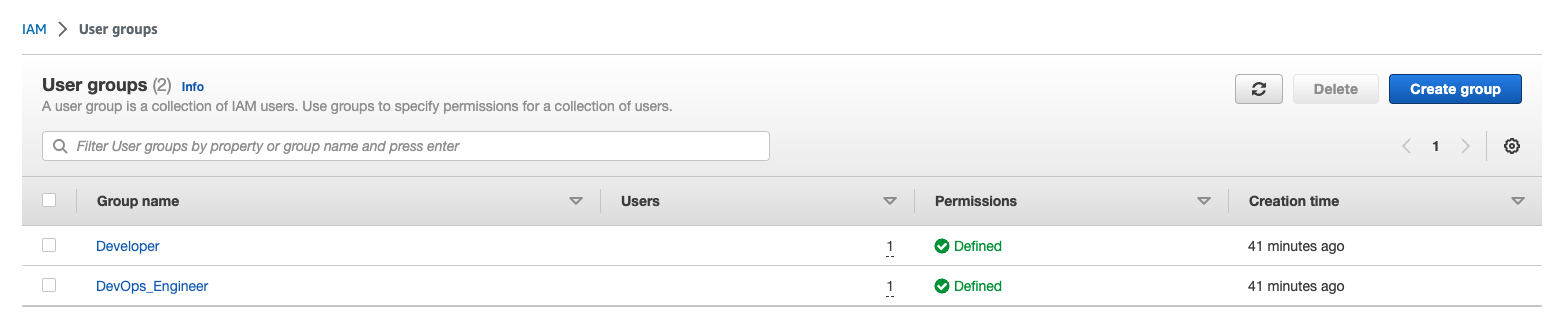
resource "aws_iam_group" "developer" {
name = "Developer"
path = "/"
}
resource "aws_iam_group_membership" "dev-group" {
name = "Developer"
users = [ "${aws_iam_user.iges.name}" ]
group = "${aws_iam_group.developer.name}"
}
resource "aws_iam_group_policy_attachment" "iam-developer" {
group = aws_iam_group.developer.name
policy_arn = "arn:aws:iam::aws:policy/ReadOnlyAccess"
}
resource "aws_iam_group_policy_attachment" "iam-dev" {
group = aws_iam_group.developer.name
policy_arn = "arn:aws:iam::aws:policy/IAMUserChangePassword"
}
resource "aws_iam_user" "tuxnoob" {
name = "tuxnoob-admin"
tags = {
Name = "Administrator Infra"
ManagedBy = local.manage
organization = local.organization
}
}
resource "aws_iam_user_login_profile" "tuxnoob" {
user = aws_iam_user.tuxnoob.name
pgp_key = local.pgp_key
}
resource "aws_iam_group" "devops" {
name = "DevOps_Engineer"
path = "/"
}
resource "aws_iam_group_policy_attachment" "iam-devops" {
group = aws_iam_group.devops.name
policy_arn = "arn:aws:iam::aws:policy/AdministratorAccess"
}
resource "aws_iam_group_membership" "devops-group" {
name = "DevOps_Engineer"
users = [ "${aws_iam_user.tuxnoob.name}" ]
group = "${aws_iam_group.devops.name}"
}
The above script will change the Account ID or alias for login with IAM users, and for iam user login use keybase.
2. Create Keybase Terraform Script For login profile IAM Users
If you not have keybase account, can register in here. After register you will direct to download keybase which specified your operating system like linux, windows, macOs etc. In here use macOs as operating system, so i have two options can downloaded from a website or can installing by brew.
After installed your keybase, then you need login in your keybase apps then generate the key with command:
1
keybase pgp gen
OR can generate first with gpg:
1
gpg --full-generate-key
example output prompt when generate with gpg:
1
2
3
4
5
6
7
8
9
10
11
12
13
14
15
16
17
18
19
20
21
22
23
24
25
26
27
28
29
30
31
32
33
34
35
36
37
38
39
40
41
42
43
44
45
46
47
48
gpg (GnuPG/MacGPG2) 2.2.40; Copyright (C) 2022 g10 Code GmbH
This is free software: you are free to change and redistribute it.
There is NO WARRANTY, to the extent permitted by law.

Please select what kind of key you want:
   (1) RSA and RSA (default)
   (2) DSA and Elgamal
   (3) DSA (sign only)
   (4) RSA (sign only)
  (14) Existing key from card
Your selection? 1
RSA keys may be between 1024 and 4096 bits long.
What keysize do you want? (3072)
Requested keysize is 3072 bits
Please specify how long the key should be valid.
         0 = key does not expire
      <n>  = key expires in n days
      <n>w = key expires in n weeks
      <n>m = key expires in n months
      <n>y = key expires in n years
Key is valid for? (0) 10y
Key expires at Wed Jan 26 01:01:12 2033 WIB
Is this correct? (y/N) y

GnuPG needs to construct a user ID to identify your key.

Real name: tuxnoob
Email address: tuxnoob@example.com
Comment: Personal GPG for write in blog
You selected this USER-ID:
    "tuxnoob (Personal GPG for write in blog) <tuxnoob@example.com>"

Change (N)ame, (C)omment, (E)mail or (O)kay/(Q)uit? O
We need to generate a lot of random bytes. It is a good idea to perform
some other action (type on the keyboard, move the mouse, utilize the
disks) during the prime generation; this gives the random number
generator a better chance to gain enough entropy.
We need to generate a lot of random bytes. It is a good idea to perform
some other action (type on the keyboard, move the mouse, utilize the
disks) during the prime generation; this gives the random number
generator a better chance to gain enough entropy.
gpg: revocation certificate stored as '/Users/tuxnoob/.gnupg/openpgp-revocs.d/xxxxxxxxxxxxxxxxxxxx.rev'
public and secret key created and signed.

pub   rsa3072 2023-01-28 [SC] [expires: 2033-01-25]
      xxxxxxxxxxxxxxxxxxxxxxxxxxxx
uid                      tuxnoob (Personal GPG for write in blog) <tuxnoob@example.com>
sub   rsa3072 2023-01-28 [E] [expires: 2033-01-25]
2. Create Provider Terraform Script
Providers it’s important to create, because will use to define like a credentials path, profile and region.
providers.tf
1
2
3
4
5
provider "aws" {
  shared_credentials_files = var.credentials_file
  profile = var.profile
  region = var.region
}
3. Create Variables Terraform Script
Variables is very important to defined centrally controlled reusable values. This variables can customize values of aspect in terraform.
variables.tf
1
2
3
4
5
6
7
8
9
10
11
12
variable "credentials_file" {
  description = "PATH to credentials file on your local laptop"
  default = ["~/.aws/credentials"]
}
variable "profile" {
  description = "Profile of AWS credential"
  default = "root-tuxnoob"
}
variable "region" {
  description = "AWS Region"
  default = "ap-southeast-1"
}
4. Create Output Terraform Script
The output terraform is needed for share when applied with terraform, like password, modules etc.
output.tf
1
2
3
4
5
6
7
8
9
10
11
12
13
14
15
output "tuxnoob" {
  description = "print the credentials tuxnoob"
  value = {
    login = aws_iam_user.tuxnoob.name
    encrypted_password = aws_iam_user_login_profile.tuxnoob.encrypted_password
  }
}

output "iges" {
  description = "print the credentials iges"
  value = {
    login = aws_iam_user.iges.name
    encrypted_password = aws_iam_user_login_profile.iges.encrypted_password
  }
}
5. Apply Terraform
After create, then we will applying terraform with command:
1
2
3
terraform init (this is for initializing a working directory containing terraform script)
terraform plan (this command to show execution plan)
terraform apply (this command for deployinng or provisioning new resources)
you can skip the prompt when your apply, with add option -auto-approve. Will be:
1
terraform apply -auto-approve
Results:
6. Show Output to Show Encrypted Password After Applied
After completed or finished terraform process, one more task to show the credentials. because default credentials will encrypted, so in here should decrypt this credentials for login. Use this command to decrypt your encrypted password. For example, i will decrypt tuxnoob credentials:
1
terraform output -json tuxnoob | jq -r '.encrypted_password' | base64 --decode | keybase pgp decrypt
If you got error message
1
ERROR decrypt error: unable to find a PGP decryption key for this message
You should import first, with this command:
1
2
3
4
5
6
7
8
9
10
11
12
13
14
15
16
17
18
19
20
21
keybase pgp select --multi --import
You are selecting a PGP key to publish in your profile, and
importing secret key to *local*, *encrypted* Keybase keyring.

If your GnuPG key is encrypted, you will be asked for passphrase
to unlock it. You may be asked *twice* - first by GnuPG, to export
encrypted key bundle, and then by Keybase, to unlock the secret key.

Please note that this will not work if your secret key lives on a
hardware device (like a smart card or a Yubikey).

#    Algo    Key Id             Created   UserId
=    ====    ======             =======   ======
1    4096R   XXXXXXXXXXXXXXXX             XXXXXXXXXXX
2    3072R   XXXXXXXXXXXXXXXX             tuxnoob <tuxnoob@example.com>
Choose a key: 2
You've already selected this public key for use on Keybase. Would you like to update it on Keybase? [Y/n] y
▶ INFO Posting update for key xxxxxxxxxxxxxxxxxxxxxxxxxxxxxxxx.
▶ INFO Key was already up to date.
Do you want to import secret half of this key to local Keybase keyring? [Y/n] y
▶ INFO Key xxxxxxxxxxxxxxxxxxxxxxxxxxxxxxxx already exists. Only importing the private key.
Then re-run the command terraform output again in above, then voila you got the password.
Next i will share tutorial to create a IAM ROLE so that the users on AWS Root Account can assume role to new OU.
Full source code: Soon update