How to Configure S3FS for Mounting on AWS EC2 With Provisioning Using Terraform: Step-by-Step Guide
Image by Arief JR
S3fs is mean s3 filesystem that can mounting s3 bucket into operating system such as linux, macOs and FreeBSD via FUSE (Filesystem in Userspace). To install and configuration s3fs that can mounting to your aws ec2 follows the detailed step-by-step in below:
Step 1: Create terraform file to provisioning an EC2 Instance
Before setup you can find this module in here and clone it. After cloned you can launch or provisioning you aws ec2 instance with terraform, then you can only create 1 terraform file to provisioning the ec2. Below this terraform to provisioning aws ec2 for s3fs.
1
2
3
4
5
6
7
8
9
10
11
12
13
14
15
16
17
18
19
20
21
22
23
24
25
26
27
28
29
30
31
32
33
34
35
36
37
38
39
40
41
42
43
44
45
46
47
48
49
50
51
52
53
54
55
56
57
58
59
60
61
62
63
64
65
66
67
68
69
70
71
72
73
74
75
76
77
78
79
80
81
82
83
84
85
86
87
88
89
90
91
92
93
94
95
96
97
98
99
100
101
102
103
104
105
106
107
108
109
110
111
112
113
114
115
116
117
118
119
120
121
122
123
124
125
126
127
128
129
130
131
132
133
134
135
136
137
138
139
140
141
142
143
144
145
146
147
148
149
150
151
152
153
154
155
156
157
158
159
160
161
162
163
164
165
166
167
168
169
170
171
172
173
174
175
176
177
178
179
180
181
182
data "aws_availability_zones" "available" {}

terraform {
  backend "s3" {
    encrypt                 = true
    bucket                  = "terraform-tuxnoob"
    region                  = "ap-southeast-3"
    key                     = "terraform-tuxnoob/Infra/AWS-EC2/S3fs/terraform.tfstate"
    profile                 = "default"
    shared_credentials_file = "~/.aws/credentials"
    role_arn                = "arn:aws:iam::xxxxxxxxxxxxxxx:role/DevOps_Engineer"
  }
}

locals {
  subnet_id = ["subnet-xxxxxxxxxxxxxx"]
  profile   = "default"
  region    = "ap-southeast-3"
  #  ec2-name = "testing-devstaging-${trimprefix(data.aws_availability_zones.available.names[count.index], "ap-southeast-")}"
  ec2-name = "Tuxnoob-S3fs"
  #  sg-name = "testing-devstaging-sg-${trimprefix(data.aws_availability_zones.available.names[count.index], "ap-southeast-")}"
  sg-name = "Tuxnoob-S3fs-SG"
  tags = {
    Environment  = "Tuxnoob Infrastructure"
    Env          = "Infra"
    Organization = "tuxnoob-id"
    ManagedBy    = "terraform"
    Terraform    = true
    Type         = "storage-infra"
  }

}

###############################################################################
###############################################################################
###############################################################################

#Provider AWS
provider "aws" {
  shared_credentials_files = ["~/.aws/credentials"]
  profile                  = local.profile
  region                   = local.region
}

#AWS Key Name
resource "aws_key_pair" "tuxnoob" {
  key_name   = "tuxnoob-s3fs"
  public_key = file("~/.ssh/deployer.pub")
}

#AWS EC2
module "ec2_instance" {
  source                      = "../ec2/"
  count                       = 1
  name                        = "${local.ec2-name}-${trimprefix(data.aws_availability_zones.available.names[count.index], "ap-southeast-")}"
  ami                         = "ami-06edbb08d7b9081ce"
  instance_type               = "t4g.small"
  key_name                    = aws_key_pair.tuxnoob.id
  vpc_security_group_ids      = aws_security_group.tuxnoob-s3fs-sg[*].id
  subnet_id                   = ["${local.subnet_id[count.index]}"]
  user_data                   = file("tuxnoob.sh")
  associate_public_ip_address = true

  root_block_device = [
    {
      device_name = "/dev/sda1"
      volume_size = 15
      volume_type = "gp3"
    }
  ]

  tags = merge({ "Name" = "${local.ec2-name}-${trimprefix(data.aws_availability_zones.available.names[count.index], "ap-southeast-")}" }, local.tags)
}

# Security Group Creation
resource "aws_security_group" "tuxnoob-s3fs-sg" {
  count  = 1
  name   = "${local.sg-name}-${trimprefix(data.aws_availability_zones.available.names[count.index], "ap-southeast-")}"
  vpc_id = "vpc-xxxxxxxxxxx"

  tags = merge({ "Name" = "${local.sg-name}-${trimprefix(data.aws_availability_zones.available.names[count.index], "ap-southeast-")}" }, local.tags)
}

# Ingress Security Port 22
resource "aws_security_group_rule" "ssh_inbound_access" {
  count             = 1
  description       = "allow for ssh access"
  from_port         = 22
  protocol          = "tcp"
  security_group_id = element(aws_security_group.tuxnoob-s3fs-sg.*.id, count.index)
  to_port           = 22
  type              = "ingress"
  cidr_blocks       = ["10.0.0.0/16"]
}

resource "aws_security_group_rule" "nodeexporter_inbound_access" {
  count             = 1
  description       = "allow for nodeexporter metrics"
  from_port         = 9100
  protocol          = "tcp"
  security_group_id = element(aws_security_group.tuxnoob-s3fs-sg.*.id, count.index)
  to_port           = 9100
  type              = "ingress"
  cidr_blocks       = ["10.0.0.0/16"]
}

# All OutBound Access
resource "aws_security_group_rule" "all_outbound_access" {
  count             = 1
  from_port         = 0
  protocol          = "-1"
  security_group_id = element(aws_security_group.tuxnoob-s3fs-sg.*.id, count.index)
  to_port           = 0
  type              = "egress"
  cidr_blocks       = ["0.0.0.0/0"]
}

# Output EC2 Instance
output "key_name" {
  value       = aws_key_pair.tuxnoob
  description = "Name of key pair RSA"
}

output "region" {
  description = "AWS region."
  value       = local.region
}

output "profile" {
  description = "AWS profile."
  value       = local.profile
}

output "security_group" {
  value       = aws_security_group.tuxnoob-s3fs-sg[*].id
  description = "Id of security group"
}

output "ec2_instance_id" {
  description = "The ID of the instance"
  value       = module.ec2_instance[*].id
}

output "ec2_instance_arn" {
  description = "The ARN of the instance"
  value       = module.ec2_instance[*].arn
}

output "ec2_instance_capacity_reservation_specification" {
  description = "Capacity reservation specification of the instance"
  value       = module.ec2_instance[*].capacity_reservation_specification
}

output "ec2_instance_instance_state" {
  description = "The state of the instance. One of: `pending`, `running`, `shutting-down`, `terminated`, `stopping`, `stopped`"
  value       = module.ec2_instance[*].instance_state
}

output "ec2_instance_primary_network_interface_id" {
  description = "The ID of the instance's primary network interface"
  value       = module.ec2_instance[*].primary_network_interface_id
}

output "ec2_instance_private_dns" {
  description = "The private DNS name assigned to the instance. Can only be used inside the Amazon EC2, and only available if you've enabled DNS hostnames for your VPC"
  value       = module.ec2_instance[*].private_dns
}

output "ec2_instance_public_dns" {
  description = "The public DNS name assigned to the instance. For EC2-VPC, this is only available if you've enabled DNS hostnames for your VPC"
  value       = module.ec2_instance[*].public_dns
}

output "ec2_instance_public_ip" {
  description = "The public IP address assigned to the instance, if applicable. NOTE: If you are using an aws_eip with your instance, you should refer to the EIP's address directly and not use `public_ip` as this field will change after the EIP is attached"
  value       = module.ec2_instance[*].public_ip
}

output "ec2_instance_tags_all" {
  description = "A map of tags assigned to the resource, including those inherited from the provider default_tags configuration block"
  value       = module.ec2_instance[*].tags_all
}
In above terraform is call the ec2 module, i add the terraform to init backend in aws s3. then you adjust it again like a subnet id, vpc id, ami id and architecture. For example in above using ubuntu with architecture arm64 and also add security group to allow node exporter port for metrics monitoring.
Step 2: Add shell file to customization when applying terraform
This step for customize this ec2 instance, for example this is will install s3fs on ubuntu. because s3fs has included into several operating system, you can read here. Create the file with your own, for example:
Create the file with
1
vim tuxnoob.sh
Then insert into this files:
1
2
3
4
5
6
7
8
9
#!/bin/bash
echo "Hello tuxnoobdotcom!"
sudo apt update -y && sudo apt upgrade -y
sudo apt install -y figlet toilet
sudo echo "Banner /etc/motd" >> /etc/ssh/sshd_config
sudo systemctl restart sshd
sudo figlet tuxnoobdotcom > /etc/motd

sudo apt install -y s3fs
And save this files with press esc and type :wq.
Running the terraform with command
1
2
3
terraform init (to initialize backend)
terraform plan (for showing what will be applied)
terraform apply (applying terraform for provisioning your aws ec2)
Alternatively, you can add option when applying terraform to skip prompt with command:
1
terraform apply -auto-approve
Wait until provisioning ec2 for s3fs has completed.
Step 3: Configure s3fuse on your AWS EC2
Create a credential file to store your AWS credentials:
1
echo ACCESS_KEY_ID:SECRET_ACCESS_KEY > ~/.passwd-s3fs
Replace ACCESS_KEY_ID and SECRET_ACCESS_KEY with your actual AWS credentials. If not created you can follow this for create the aws access key and secret key:
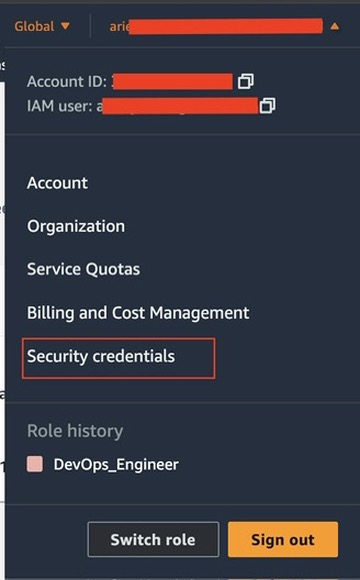
Login to your aws management console, then in the right corner select your account then choose security credentials
Then create your aws access key
Secure the credential file by changing its permissions:
1
chmod 600 ~/.passwd-s3fs
Step 4: Mount the S3 Bucket
Create a directory where you want to mount the S3 bucket:
1
sudo mkdir /mnt/s3bucket
Mount the S3 bucket using S3FS:
1
s3fs your_bucket_name /mnt/s3bucket -o passwd_file=~/.passwd-s3fs
Replace your_bucket_name with the name of your S3 bucket.
Step 5: Verify the Mount
List the contents of the mounted directory to verify the mount:
1
ls /mnt/s3bucket
Step 6: Automate the Mounting Process (Optional)
Edit the /etc/fstab file to automate the mounting process on boot:
1
sudo vim /etc/fstab
Add the following line to the fstab file:
1
s3fs <your_bucket_name> /mnt/s3bucket fuse _netdev,passwd_file=/home/ec2-user/.passwd-s3fs 0 0
Save and exit the editor.
Step 7: Test the Automount
Reboot your instance to ensure the S3 bucket mounts automatically:
1
sudo reboot
After the instance reboots, check if the S3 bucket is mounted:
1
ls /mnt/s3bucket
Following these steps will configure S3FS to mount your S3 bucket on an AWS EC2 instance successfully.


